
Hi everyone! Yay for the weekend! Hope you’ve been enjoying the warmer weather. The temperature has been all over the place here in Baltimore. It was 60 degrees on Thursday, yesterday was 33 degrees with a wintery mix, and today is a sunny 42 degrees ![]() .
.
So this isn’t the most exciting post. Skip if you aren’t interested, but I wanted to share how much we ended up spending while traveling abroad for 6 months. I tried my best to be very thorough and keep track of every dime (or rupee etc) we spent as we spent it. Running out of money midway through the trip would have been a horrible way to end our travels. So to prevent that from happening, I kept track of our spending by using a google spreadsheet via google drive and updated it regularly (when we had WiFi).
So here it is:
A few things to note:
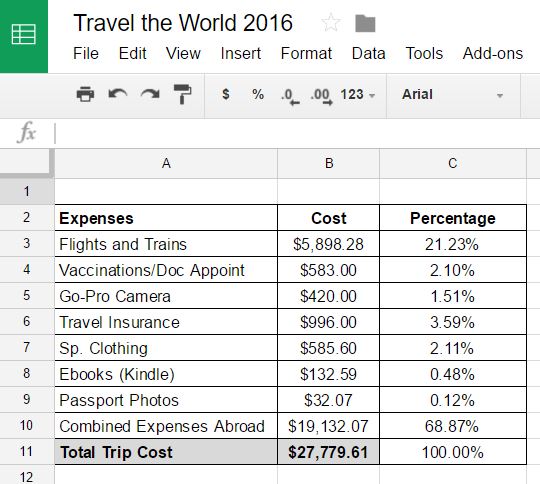
1-Flights and Trains include both pre-trip and during trip purchases. We had purchased the first few flights months before we left and then bought the remaining as we went. The trains represent any international train travel in Europe only.
2-For our travel insurance, we went with the World Nomads Explorer Plan. Luckily we did not need it, but you never know and we would rather be safe than sorry.
3-Sp. Clothing represents any items purchased for colder temps. We did not want to pack and carry around warm clothing that we would not wear during the beginning of our trip (it is HOT in Southeast Asia). So we decided that if/when we traveled to colder temps, we would purchase what we needed as we went. We did not include this expense item with any particular country since we needed warmer clothing for several.
4-The Combined Expenses Abroad are itemized in the embedded spreadsheet summary below.
(I tried to freeze the left column, but it does not work when you embed spreadsheets so here is the link as well: Combined Expenses Abroad Summary)
Some additional notes:
1-Travel represents any travel costs within a city (taxi, public transit, some car rentals) while Major Transit represents any travel costs between cities. This actually also includes any international train or bus travel within Asia. They were so cheap, we just lumped them with the country in which we purchased them. Probably should’ve taken them out, but well I’m lazy.
2-Entertainment includes any movie theater visits and other miscellaneous non-touristy activities. Because sometimes you just want to take it easy.
3-Clothing includes any unnecessary clothing purchases and laundry costs.
4-Miscellaneous includes any gifts, toiletries etc.
5-Laos and Nepal values are slightly skewed. The Gibbon Experience and The Annapurna Base Camp Trek were both lump sum costs that are included in the Tourist Activities Expense, but really should also be divvied up between lodging and food.
6-Fortunately for us, we had free lodging in San Fran, South Korea, and Japan.
Our pre-trip expenses were a little over $3,000 and included:
- The first few flights ($2,000 worth)
- Vaccinations
- Vietnam Visas (only one we got in advance since we were planning to do a border crossing, all the others we received upon arrival)
- Additional passport photos (for those Visas upon arrival)
- The Go-Pro
- Travel Insurance
Our preliminary budget for once we were on the road was $20,000. I did a lot of research leading up to our trip including reading travel blogs, coming up with a tentative itinerary and transportation costs, and trying to figure out other costs (visas, lodging, food, activities, etc). We obviously went over by $4,000+, so I underestimated big time in some areas but I also had a $5,000 cushion in savings (because I had a feeling we would need it).
Some things I learned and pointers for estimating your own trip:
- A good rule of thumb for estimating daily costs (lodging, food, laundry, toiletries, taxis, other misc) is to look up lodging costs per night (we used mostly hostels) in the desired destinations and multiply that number by 3. We used this method and then estimated how many days we thought we would spend in each destination to calculate an initial base cost. For the most part, this held true and was a conservative estimate when looking at our final numbers. It actually ended up encompassing a lot of the alcohol costs, especially in cheaper countries. So if you’re on a tight budget or don’t drink alcohol, you could probably get away with using 2.5 instead of 3.
- Since we had a general idea of countries we wanted to visit, I came up with a fun budget by researching any tourist activities I thought we would be interested in and their costs. This ended up being severely underestimated. So I did a little math based on our final numbers and determined that $13/person/day is an easier way to get a very rough number. This value includes our tourist activity splurges in Laos, Nepal, and Iceland. Without those splurges, you can go down to $7-$8/person/day and if you’re going to be traveling to more expensive countries, then I would definitely round up accordingly ($40/person/day average for our splurge countries only).
- As I mentioned above, the factor of 3 included a lot of our alcohol and we drank quite a bit. But if you want to keep it separate, here are a few rough factors that you can use based on our final numbers. Use $5/person/day in Asia and $13/person/day in Europe (remember we were in Central Europe for the majority of our time tho, beer is a little cheaper there than in Western Europe).
- I was able to estimate flights/trains by looking up costs based on our tentative route. The flight estimates were right on (I used Kayak and Skyscanner), but I did underestimate the trains (did not do as much research). This is a bit more difficult to provide a rule of thumb value to use. I think you just need to do the research and round up or add some cushion for this one. Also, take advantage of mileage programs which is something I should’ve done more of to be honest.
- Visa requirements and costs are also something you just need to suck up and research based on your itinerary. As I mentioned earlier, we did get our Vietnam Visa in advance, but in retrospect it would have probably been cheaper to do while abroad.
- Even though it was a pain, keep track of all your expenses. It will help you to keep peace of mind while traveling.
- Keep a backup amount separate from your primary spending account. This way you don’t dip into it and have it in case you go over budget (like we did).
- As a precaution we split up our spending money between a couple different Charles Schwab checking accounts and kept the cards separate (along with having a hidden stash of cash). This way if a card were to be stolen or lost, we would have backup. We went with Charles Schwab Bank since they reimburse all ATM fees. Getting cash from ATMs is easiest and equates to the best conversion rates.
- Last but not least, if possible, start with cheaper countries first. I think at the beginning of our travels, we were still adjusting and not as tight with the budget. We really should’ve skipped San Francisco and saved it for another trip (we spent way too much there and we had free lodging!). Not only is it cheaper to start this way, but cheaper countries tend to be a little more work to travel in (not as clean, more negotiating required etc). By the time you make it to more expensive destinations, you will have gotten a better handle on the spending and will really appreciate the ease of travel in comparison to cheaper destinations.
Well that is all I’ve got on our World Travel finances. Hopefully you’re still awake and I didn’t confuse you too much. It definitely takes doing your research and rounding up. We could’ve easily stretched our money further to travel longer or avoid going over our initial budget, but I think we had a nice balance of budget friendly, indulgent, comfortable, and once in a lifetime experiences that were worth every over-budget penny.
Enjoy your Playoff Football Sunday!
Until next post,
Kimberly
P.S. Photo/Go Pro Video Tip: Load all photos/videos to Drop Box or Google Photos to prevent everything from being lost if you were to lose or have your phone/camera stolen. In some cases you can set it up to automatically upload when connected to (good) WiFi. I also created Google Photo Albums for each country as we went to prevent having to do it all at once in the end.
